Tuesday, July 7, 2015

IRNN vs LSTM

I was planing to make posts on experiments Neural Network one by one when I started this blog, so I started with simple MNIST example, but I was lazy keeping up my original plan, and today's post ends up talking about Recurrent Neural Network, which sounds very advanced from the last post, but the dataset I am using is still MNIST.

このブログはニューラルネットワークを一つ一つ実験しながら段階を踏んで学ぶ目的で始めたのだけれど、記録を残すことには怠惰になってしまった。そんなわけで、この投稿はリカレントニューラルネットワークについてのものになった。前回の投稿に比べると随分と進んだトピックだけれど、MNIST のデータセットを使っている点ではそう変わっていない。

There is a type of RNN called IRNN proposed in this paper. I made a variant of the experiment they conducted on MNIST dataset, using Keras. When I made a pull request, François suggested to compare it against LSTM implementation. So I did it and this post is the result.

IRNN と呼ばれる RNN がこの論文で提案された。論文内で行われた MNIST のデータを使った実験の設定を少し変えたものを Keras を使って実装してみた。それのプルリクエストを作成したところ、フランソワから LSTM との比較も行ってみては?と言われたのでやってみた。この投稿はその結果になる。

The code I used for the experiment is already merged in Keras, and here is the link. By using SimpleRNN class, IRNN can be implemented in few lines of codes as bellow.

まず実験に使用したコードは既に統合されているのでそのリンクをここに貼っておく。 IRNN の実装は SimpleRNN クラスを応用するだけで、数行程で以下のように書ける。

IRNN

model = Sequential()
model.add(SimpleRNN(input_dim=1, output_dim=100,
                    init=lambda shape: normal(shape, scale=0.001),
                    inner_init=lambda shape: identity(shape, scale=1.0),
                    activation='relu', truncate_gradient=28*28))
model.add(Dense(100, 10))
model.add(Activation('softmax'))

LSTM

model = Sequential()
model.add(LSTM(input_dim=1, output_dim=100,
               init='glorot_uniform', inner_init='orthogonal', forget_bias_init='one',
               activation='tanh', inner_activation='hard_sigmoid',
               weights=None, truncate_gradient=-1, return_sequences=False))
model.add(Dense(100, 10))
model.add(Activation('softmax'))

As the optimizer for the experiment, I used RMSProp instead of SGD. This is because SGD fails to optimize the network, depending on momentum value. Worse, actually I couldn't make it work on IRNN. Instead of finding the good momentum value and decay rate with grid search, I used RMSprop with the same starting learning rate. I run the first few dozens of epochs with different seed value for random initialization, and it could be observed that RMSprop works pretty well, and is faster and steadier than SGD.

最適化には、論文の実験とは違って RMSprop を用いた。これは SGD はモーメンタムの値次第で最適化が失敗するからだ。というより、IRNN で数種類の値を試したのだけれどどれも全く上手くいかなかった。この適切な値を探索する代わりに、初期学習率を同じに設定した RMSprop を使ってみると反応は良好だった。重みをランダムに初期化する際の乱数生成器のシードの値を変えながら、実験の最初数十回分だけイタレーションを実行してみると、どれも上手く学習しているように見えた。実際のところ SGD に比べると RMSprop の方が学習が速くて、損失の減衰具合がより安定していた。

I used different batch size, 32 than the original paper, 16. This is done for making GPU computation time reasonable. As Keras process training data batch by batch, when it runs on GPU, batch size must be large enough to compensate for the time required to forward batch to GPU memory.

バッチ数が元の論文の 16 から 32 に変更されているのは GPU で計算する際にはある程度バッチ数を大きくしないと CPU よりも遅くなるからだ。これは GPU のメモリにバッチ単位で学習データを転送することに起因する。

In IRNN I truncated BPTT after 28*28 timesteps, which is identical to actual length of input sequence, but applying the same setting to LSTM did not work. I ended up not using BPRR truncation in LSTM. I have not figured out why. (By the way, IRNN also fails without enabling BPTT. It's interestingly opposite.)

IRNN では BPTT の打ち切り回数をシーケンスの長さと同じの 28 * 28 に設定したけれど、LSTM で同じように設定すると学習が上手くいかなかった。結局 LSTM ではBPTT を使わなかった。原因はまだ突き止めていない。(ちなみに IRNN の方で BPTT を無効にすると、これまた上手くいかない。不思議だ。)

The docstring of SimpleRNN class says "Not a particularly useful model, included for demonstration purposes". But I think that it's thanks to Keras' highly sophisticated design principle that IRNN, which should be conceptually simple could be actually implemented very simply.

SimpleRNN クラスのドックストリングには「特に便利なクラスではないが実装方法の紹介のために載せておく」と書かれているけれど、「シンプルなアーキテクチャでいい結果が得られる。」と主張する元の論文を、実際にシンプルに実装できるのは Keras のアーキテクチャが特段優れているからではないだろうかと思った。

The following is the result. The experiment with LSTM is not finished yet, so the figure is not finalized, but the same tendency as the original paper can be observed. In this experiment, batch size is 32 so the number of steps in one epoch is 1875.

以下が実験の結果になる。LSTM の方はまだ終わっていないので途中経過でしかないのだけれど、論文と似た傾向は観察できる。この実験ではバッチサイズが 32 なので、1エポックのステップ数が 1875 になる。


In this experiment, computation time required to finish one epoch with IRNN was much smaller than that of LSTM. This might depend on library implementation, but using above code with Keras on K520 GPU (in AWS EC2 g2.2xlarge instance), IRNN took about 440 seconds to finish one epoch, and LSTM took 1700 seconds. Taking these into account, the following is the learning curve based on computation time.

この実験では IRNN は LSTM よりも1エポックの計算にかかる時間が短かった。これはライブラリの種類や実装方法によるのかもしれないけれど、Keras で上記のコードを使った場合、IRNN では1エポック約 440 秒に対して LSTM では 1700 秒かかった。これらを加味して、計算時間を元にした学習の様子をプロットすると次のようになる。


The result so far is very interesting. IRNN is architecturally very simple and, though I am not sure if that is causing but, learns very fast. I became however rather skeptic about the validity of using sequential MNIST for this experiment. Even though I set BPTT truncation to 28*28 timesteps, but does it have that long dependency? Further experiment will be needed to verify this.

ここまでの結果は面白いものになった。IRNN はモデルがシンプルで、それ故かどうかわからないが学習がとても速い。しかしながら、MNIST をこの実験で使うのはそれほど妥当なのだろうかという疑問を抱いた。BPTT を 28*28 ステップに設定はしたが、このデータセットはそれほど長い依存性を持っているのだろうか?これを確かめるためには他のデータセットで実験をしてみる必要があるだろう。

Monday, March 2, 2015

Step by Step Neural Network: Rectified Linear Unit

Rectified Linear Unit (ReLU) is computationally cheap and can avoid vanishing gradient problem in back-propagation, so it is widely used in deep learning. Following is the definition and the derivative of ReLU.

Rectified Linear Unit (ReLU) は計算量が少なく、vanishing gradient problem を回避できるのでディープラーニングでよく使われる。以下がその定義とその導関数である。

$$\begin{align*} f(x) &= max(0, x) \\ \\ \frac{df(x)}{dx} &= (sign(x)+1)/2 \end{align*}$$
Unlike sigmoid or hyperbolic tangent function, the derivatives of ReLU do not converge to $0$ at $x\rightarrow\inf$, so network is optimised faster, and the error is propagated properly to the next layer even for networks with multiple hidden layers. However, if a unit is not activated, then the parameters of the unit are not updated. Their update values are always $0$. So depending on the configuration of optimisation parameters, it is possible that network does not converge to its optimal weight. The following illustration shows it. In addition to it, it is also possible that a unit is never activated during training, the presence of such dead unit leads to the decrease of network's representation capacity.

ReLU をシグモイドや双曲正接関数と比較した場合の最大の特徴は、導関数の値が $x\rightarrow\inf$ でも $0$ にならないことである。これによって、学習の速度が速くなること、また、多層ネットワークでは伝搬されて来たエラーをそのまま次のレイヤーに伝搬するので、階層の深いレイヤーでもパラメーターがきちんと更新されるという点である。ただし、活性化しなかったユニットのパラメーター更新量は $0$ になるので、更新パラメーター次第では最適値に収束しない場合がある。下図はそれを模式的に表している。また、重みの状態次第では訓練中に一度も活性状態にならないユニットが出現する。このような死亡状態のユニットが出現すると、それはすなわち隠れユニットの数が減少することに等しく、ネットワークの表現能力が下がってしまう。


Code: ReLU

# ReLU function and its derivative
def ReL(x):
    return np.maximum(0, x)


def dReL(x):
    return (np.sign(x)+1) / 2


### Forward pass
# Output from the hidden layer
x_out = ReL(B1+np.dot(W1, x_hid))
# Output from the output layer
y_out = softmax(B2+np.dot(W2, x_out))

### Backward pass
t = t.reshape((-1, 1))
# Output layer
error = y_out - t
dEdW2 += np.dot(error, x_out.T) / n_train
dEdB2 += error / n_train
# Hidden layer
error = np.dot(W2.T, error) * dReL(B1+np.dot(W1, x_hid))
dEdW1 += np.dot(error, x_hid.T) / n_train
dEdB1 += error / n_train

Result

The following figures are the comparison of sigmoid function, hyperbolic tangent function, and ReLU as activation function. When learning rate and momentum are high, the network suffers from unstable improvement.

以下の図は活性化関数にシグモイド関数、双曲正接関数、ReLU を用いたときの最適化の様子を比較したものである。学習率とモーメンタムの値が高いところでは、改善性が不安定になる。
The following figures show the ratio of active units (units which were activated at least once during each of training/validation/test stage) throughout the iteration. When learning rate and momentum are high, many activation units are dead at the beginning of the optimisation.

以下の図は最適化途中の有効な活性化ユニット(訓練、バリデーション、テストのそれぞれの段階で最低一度は活性化したユニット)の割合を示している。学習率とモーメンタムの値が高いところでは、活性化ユニットの多くが初期段階で死亡してしまっている。

Reference

  1. What Is Special About Rectifier Neural Units Used in NN Learning? - Quora
  2. How to initialize rectifier linear units (ReLU) network : MachineLearning

Saturday, February 28, 2015

Step by Step Neural Network: Hyperbolic Tangent

So far we used sigmoid function as the activation function in the hidden layer. I am going to try other functions also such as, hyperbolic tangent and rectified linear unit (ReLU). Firstly we look into hyperbolic tangent. The definition of hyperbolic tangent function and its derivative is as follow.

ここまで、隠れ層の活性化関数にはシグモイド関数を使って来た。ここでその他の関数、 双曲正接関数rectified linear unit (ReLU) 等も使ってみようと思う。まず双曲正接関数についてみていく。双曲正接関数の定義と微分は以下のようになる。


$$\begin{align*}\tanh(x) &= \frac {exp(x) - \exp(-x)} {exp(x) + exp(-x)} \\ \\ \frac{d}{dx}\tanh(x) &= 1-\tanh^2(x) \end{align*}$$

Hyperbolic tangent function is a linear transformation of sigmoid function and their relationship can be derived as follow.

双曲正接関数はシグモイド関数を線形変換したものになっており、その関係は以下のように導出できる。
$$\begin{align*} \tanh(x) &= \frac {exp(x) - exp(-x)} {exp(x) + exp(-x)} \\ \\ &= \frac{1 - exp(-2x)}{1 + exp(-2x)} \\ \\ &= \frac{1+exp(-2x)-2exp(-2x)}{1 + exp(-2x)} \\ &= 1 - \frac{2exp(-2x)}{1+exp(-2x)} \\ \\ &= 1 -2(\frac{1+exp(-2x)-1}{1+exp(-2x)})\\ \\ &= 1 -2 (1 - \frac{1}{1+exp(-2x)}) \\ \\ &= 1 -2 (1 - \sigma(2x)) \\ \\ &= 2\sigma(2x) -1 \end{align*}$$
where $\sigma(x)=\frac{1}{1+exp(x)}$ is sigmoid function.
ここで、$\sigma(x)=\frac{1}{1+exp(x)}$はシシグモイド関数

As $tanh$ has greater gradient than sigmoid function, applying $tanh$ should fasten the network optimisation. Also, the range of output of $tanh$ is $[-1, 1]$ and this is better suited for optimisation. The reason is described in "Efficient Backprop" by Le Cunn et al. Simply said, when all the components of an input vector have the same sign (plus or minus), then the weight vector of an activation unit is updated in either all decreased or all increased at the same time. Therefor, in order a weight vector to get optimised to have weight values with both positive and negative values, the network has to repeat the iteration more. This slows down the optimisation.

$tanh$ はシグモイド関数よりも急な勾配を持っているので、ネットワークの最適化がより高速になる。また、$tanh$の出力の値域が $[-1, 1]$ であり、"Efficient Backprop" by Le Cunn et al で述べられる理由により、ネットワークの最適化促進に一役買うことになる。簡単に言うと、レイヤーへの入力が全て同じ符号(正・負)を持っていたとすると、ある活性化ユニットの重みベクトルが更新される際には全ての重みの値が同時に増えるか、全ての重みの値が同時に減る、のどちらかにしかならない。これによって、重みが正負両方の値を持つ最適値に収束するためにはネットワークは最適化を何度も繰り返すことになり、全体の最適化が遅くなるのである。

Code (Modified Part)

from numpy import tanh 

### Forward pass
# Output from the hidden layer
x_out = tanh(B1+np.dot(W1, x_hid))
# Output from the output layer
y_out = softmax(B2+np.dot(W2, x_out))

### Backward pass
t = t.reshape((-1, 1))
# Output layer
error = y_out - t
dEdW2 += np.dot(error, x_out.T) / n_train
dEdB2 += error / n_train
# Hidden layer
error = np.dot(W2.T, error) * (1-x_out*x_out)
dEdW1 += np.dot(error, x_hid.T) / n_train
dEdB1 += error / n_train

Result

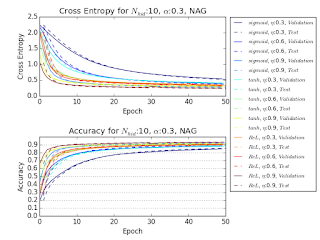
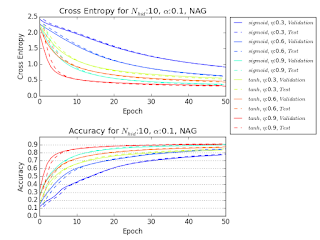
Following figures illustrates the effect of $tanh$ activation function compared against sigmoid function. The experiment is conducted using 10 mini-batch updates and Nesterov's accelerated gradient. The optimisation is accelerated effectively.

以下の表は活性化関数を $tanh$ にした時のネットワークの変化を、シグモイド関数の場合と比較して示している。実験には10分割のミニバッチ更新と Nesterov's accelerated gradient を用いた。最適化が促進されているのが分かる。

Reference

  1. machine learning - tanh activation function vs sigmoid activation function - Cross Validated
  2. Yann A. LeCun, Léon Bottou, Genevieve B. Orr and Klaus-Robert Müller: Efficient BackProp; Neural Networks: Tricks of the Trade Lecture Notes in Computer Science Volume 7700, 2012, pp 9-48

Friday, February 27, 2015

Step by Step Neural Network: Mini-batch Update

Another approach to speed-up the network optimisation is to update parameters more frequently. Mini-batch process first divide training set into small batches, then compute gradient, and updates the parameter for each batch. So if training data is divided into 10 mini-batches, then parameters are updated 10 times par epoch. The size of batch and samples must be carefully chosen so that each mini-batch preserves the data distribution of the entire original training set.

As the network is modified during sweeping the training data, we need to measure the network performance with another set of data other than training dataset. So we divide the training data into two sets of data, validation set and training set. Training set is used for parameter optimisation and validation set is used to measure the network performance for each epoch.

The following figures show the effect of mini-batching for various optimisation configuration, compared against batch updating.

ネットワーク最適化を高速にする他の手段は、パラメーターの更新頻度を上げることである。ミニバッチは訓練データをより小さなバッチに分割し、それぞれのバッチを用いて勾配を計算、パラメーターを更新する。訓練データを10個のバッチに分割したならば、パラメーターは 1 Epoch で10回更新される。訓練データを分割する際は、元の訓練データの分布が保持されるように分割数と選出するサンプルを選ばなければならない。

訓練データを一巡する間にパラメーターが随時更新されてしまうので、ネットワークの性能を測るために別のデータセットが必要になる。そこで、元々の訓練データをバリデーションセットと訓練セットの二つに分割する。パラメーターの更新には訓練セットを(ミニバッチに分割して)用い、Epoch 毎の性能の評価にはバリデーションセットを用いる。

以下の図はミニバッチによるネットワーク最適化の変化を示す。


Step by Step Neural Network: Nesterov's Accelerated Gradient

To apply Nesterov's accelerated gradient, first, store the current weight parameters, next update the weights with the previous gradient, compute the gradient, then update the weight parameters from the stored position. using the same update rule as classic momentum.

Nesterov's accelerated gradient を適応するためには、まず、勾配を計算する前に現在の重みを保存しておき、次に重みを前回の勾配を使って更新、更新された重みを使って勾配を計算する。そして、保存しておいた重みから、新たに計算された勾配を使って重みを更新する。

Code

# Store the current weight, and jump with current gradient
W1_0, B1_0, W2_0, B2_0 = W1, B1, W2, B2
W1, B1, W2, B2 = W1+mc*dW1, B1+mc*dB1, W2+mc*dW2, B2+mc*dB2

# Compute gradient using W1, B1, W2, B2
# ...

# Update weights from the stored position W1_0, B1_0, W2_0, B2_0
dW1 = - lr * dEdW1 + mc * dW1
dB1 = - lr * dEdB1 + mc * dB1
dW2 = - lr * dEdW2 + mc * dW2
dB2 = - lr * dEdB2 + mc * dB2
W1, B1, W2, B2 = W1_0+dW1, B1_0+dB1, W2_0+dW2, B2_0+dB2

Result

The following figures show the effect of Nesterov's accelerated gradient (NAG), compared against classic momentum (CM) and optimisation without momentum (plain gradient descent) for different optimisation parameter values. Network is optimised faster with NAG than with CM, and the oscillation seen in the case of CM with high momentum value does not occur with NAG.

以下の図は Nesterov's accelerated gradient (NAG) によるネットワークの学習効果の変化を、様々な最適化パラメーターの値に対して、通常のモーメンタム(CM), モーメンタムなしの場合と比較して示している。NAG の場合 CM よりも改善が速く、CM でモーメンタム係数が大きい場合に発生した振動も起こらなくなっている。